A Cold Morning at Benton Crossing
A cold morning at Benton Crossing
On February 12, 2019, I was able to capture the first Milky Way of the season. In the Northern Hemisphere, the galactic core (brightest part of the Milky Way) is behind the horizon during nighttime from late-fall to mid-winter. This is why people speak of a Milky Way “season” — mid-February through October when the galactic core is visible. In February, this part of the Milky Way is only visible for roughly 30 minutes before the sun rises, and so capturing it requires a lot of planning to make sure everything is set and opportunity isn’t missed.
I woke up around 2:30 am and drove out to Benton Crossing, CA with my 6 year old husky Neige. It was -9 degrees Fahrenheit so I wasn’t too excited to be out in the snow waiting for the Milky Way to rise, but I was anxious to capture the year’s first sights of the center of our galaxy.
Because I like to shoot the Milky Way at longer focal lengths (35mm, 50mm, 135mm), I used a star tracker. A star tracker lets one take longer exposures at a lower ISO and smaller aperture without getting star trails. This preserves the dynamic range of the photo and helps avoid chromatic aberrations (lens distortions). I almost always shoot with a star tracker these days — the sky turns out far crisper and allows me more liberty in post-processing.
A star tracker works by slowly rotating with the camera on top of it at the same rate the field of view is moving. A good star tracker will allow you to capture exposures of up to 8 minutes. The iOptron and Vixen Polarie are great first star trackers.
Because a star tracker rotates, two exposures are required - one for the sky and one for the foreground. For this specific shot, it allowed me to capture a very crisp foreground and sky and blend them together. After setting up the gear and aligning the star tracker with Polaris, the Milky Way was finally up. I was able to take my first and what happened to be my only exposure of the sky.
I wanted to avoid any chromatic aberrations so I stopped my lens down to f/4 and chose ISO 800. Shooting at 50mm, I was able to get a 2 minute and 12 second exposure without star trails. Without a star tracker the exposure time would have been limited to roughly 10 seconds after which star trails would be visible.
While the exposure was being taken, I went and hid in my car because it was so cold. After the shutter went off I scampered back to my camera. The exposure looked great and even had evidence of the sun coming up in the corner which I thought gave the picture a nice mood. Thankfully I didn’t show up any later or the light from the sun would have overpowered the Milky Way. The sky exposure can be seen below (notice the blurred foreground from the star tracker’s rotation) :

Crisp sky with blurred foreground from the tracking movement
I was satisfied with the exposure, but I noticed the buttons on both my intervalometer and my camera were starting to freeze. So without moving my tripod, I took my camera into my car to dethaw it for a bit. This actually ended up being a good thing because it allowed for a little more light to illuminate the foreground. This allowed me to shoot at very low ISO and a small aperture. These were both desirable for me because they make the foreground crisper and allow for more liberties in post-processing without adding too much unwanted noise to the photo. My final settings for the for ground exposure were ISO 400, f/10 and 3 minutes and 24 seconds. The foreground exposure is below:

Crisp foreground with star trails from the long exposure
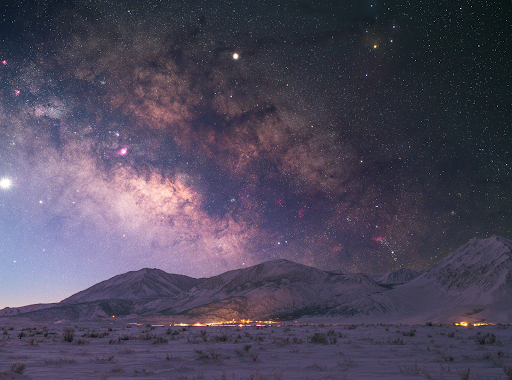
After going home and getting some sleep, it was time to combine these photos. While the exposure of the sky did a good job of capturing the Milky Way, the image was way too purple and blue. I changed the color balance slides in Photoshop to adjust this to a more natural color. I also used the adjustment brush and a few standard sliders such as highlights and whites to make the Milky Way pop more. Because I shot at a very low ISO, I was able to do a lot to the photo without sacrificing dynamic range and adding noise to the picture. Finally, I used a technique called star reduction to remove a few stars from the photo which helps the Milky Way stand out further.
For the foreground, the most obvious thing that needed to be changed was the brightness. Again, because I shot at such a low ISO, I was able to increase the exposure of the photo without losing much detail. I increased the whites and highlights to make the snow on the mountains more evident and make the town of Crowley Lake glow a little more. I made small micro adjustments to the color balance and other sliders to make the scene feel more real and give it a cold morning mood. The final blended image captured the mood I was going for; a cold morning at Benton Crossing.

The two blended together for the final image
So, the main take away is that if you spend a little extra time and preparation to shoot the night sky at low ISO and small apertures, then you’ll be greatly rewarded by being able to create the exact scene and mood you want. This can be greatly aided by using a star tracker.
Samuel Kahn is an astrophotographer living in the Eastern Sierra. He enjoys capturing landscape, panoramic, and deep space astrophotography. (IG: @alpineastro)